Spring Cloud Config 是 Spring Cloud 家族中最早的配置中心,虽然后来又发布了 Consul 可以代替配置中心功能,但是 Config 依然适用于 Spring Cloud 项目,通过简单的配置即可实现功能。
配置文件是我们再熟悉不过的了,尤其是 Spring Boot 项目,除了引入相应的 maven 包之外,剩下的工作就是完善配置文件了,例如 mysql、redis 、security 相关的配置。除了项目运行的基础配置之外,还有一些配置是与我们业务有关系的,比如说存储、短信邮件,或者一些业务开关。
对于一些简单的项目来说,我们一般都是直接把相关配置放在单独的配置文件中,以 properties 或者 yml 的格式出现,更省事儿的方式是直接放到 application.properties 或 application.yml 中。但是这样的方式有个明显的问题,那就是,当修改了配置之后,必须重启服务,否则配置无法生效。
目前有一些用的比较多的开源的配置中心,比如携程的 Apollo、蚂蚁金服的 disconf 等,对比 Spring Cloud Config,这些配置中心功能更加强大。有兴趣的可以去研究一下。
接下来,我们开始在 Spring Boot 项目中集成 Spring Cloud Config,并以 github 作为配置存储。除了 git 外,还可以用数据库、svn、本地文件等作为存储。主要从以下三部分来说一下 Config 的使用。
基础版的配置中心(不集成 Eureka);
实现配置的自动刷新;
结合 Eureka 版的配置中心,高可用方案;
基础版的配置中心
最简单的配置中心,就是启动一个服务作为服务方,之后各个需要获取配置的服务作为客户端来这个服务方获取配置。
先在 github 中建立配置文件,并在根目录下创建两个文件

data:
  env: config-eureka-dev
  user:
    username: eureka-client-user
    password: 123456789
注意文件的名称不是乱起的,例如上面的 config-single-client-dev.yml 和 config-single-client-prod.yml 这两个是同一个项目的不同版本,项目名称为 config-single-client, 一个对应开发版,一个对应正式版。
创建配置中心服务端
1、新建 Spring Boot 项目,引入 config-server 和 starter-web
<dependency>
    <groupId>org.springframework.boot</groupId>
    <artifactId>spring-boot-starter-web</artifactId>
</dependency>

<!-- spring cloud config 服务端包 -->
<dependency>
    <groupId>org.springframework.cloud</groupId>
    <artifactId>spring-cloud-config-server</artifactId>
</dependency>
配置 config 相关的配置项
bootstrap.yml 文件
spring:
  application:
    name: config-single-server  # 应用名称
  cloud:
     config:
        server:
          git:
            uri: ## 配置文件所在仓库,需要替换为你自己的仓库地址
            username: github 登录账号
            password: github 登录密码
            default-label: master #配置文件分支
application.yml
server:
  port: 3301
3、在 Application 启动类上增加相关注解 @EnableConfigServer
@SpringBootApplication
@EnableConfigServer
public class Application {
    public static void main(String[] args) {
        SpringApplication.run(Application.class, args);
    }
}
启动服务,接下来测试一下。
Spring Cloud Config 有它的一套访问规则,我们通过这套规则在浏览器上直接访问就可以。
/{application}/{profile}[/{label}]
/{application}-{profile}.yml
/{label}/{application}-{profile}.yml
/{application}-{profile}.properties
/{label}/{application}-{profile}.properties
{application} 就是应用名称,对应到配置文件上来,就是配置文件的名称部分,例如我上面创建的配置文件。
{profile} 就是配置文件的版本,我们的项目有开发版本、测试环境版本、生产环境版本,对应到配置文件上来就是以 application-{profile}.yml 加以区分,例如application-dev.yml、application-sit.yml、application-prod.yml。
{label} 表示 git 分支,默认是 master 分支,如果项目是以分支做区分也是可以的,那就可以通过不同的 label 来控制访问不同的配置文件了。
上面的 5 条规则中,我们只看前三条,因为我这里的配置文件都是 yml 格式的。根据这三条规则,我们可以通过以下地址查看配置文件内容:
http://localhost:3301/config-single-client/dev/master
http://localhost:3301/config-single-client/prod
http://localhost:3301/config-single-client-dev.yml
http://localhost:3301/config-single-client-prod.yml
http://localhost:3301/master/config-single-client-prod.yml
通过访问以上地址,如果可以正常返回数据,则说明配置中心服务端一切正常。
创建配置中心客户端
配置中心服务端好了,配置数据准备好了,接下来,就要在我们的客户端的项目中使用它了。
1、引用相关的 maven 包。
<dependency>
    <groupId>org.springframework.boot</groupId>
    <artifactId>spring-boot-starter-web</artifactId>
</dependency>

<!-- spring cloud config 客户端包 -->
<dependency>
    <groupId>org.springframework.cloud</groupId>
    <artifactId>spring-cloud-starter-config</artifactId>
</dependency>

<dependency>
    <groupId>org.springframework.boot</groupId>
    <artifactId>spring-boot-starter-actuator</artifactId>
</dependency>
2、初始化配置文件
bootstrap.yml
spring:
  profiles:
    active: dev

---
spring:
  profiles: prod
  application:
    name: config-single-client
  cloud:
     config:
       uri: http://localhost:3301
       label: master
       profile: prod


---
spring:
  profiles: dev
  application:
    name: config-single-client
  cloud:
     config:
       uri: http://localhost:3301
       label: master
       profile: dev
配置了两个版本的配置,并通过 spring.profiles.active 设置当前使用的版本,例如本例中使用的 dev 版本。
application.yml
server:
  port: 3302
management:
  endpoint:
    shutdown:
      enabled: false
  endpoints:
    web:
      exposure:
        include: "*"

data:
  env: NaN
  user:
    username: NaN
    password: NaN
其中 management 是关于 actuator 相关的,接下来自动刷新配置的时候需要使用。
data 部分是当无法读取配置中心的配置时,使用此配置,以免项目无法启动。
3、读取配置中心的内容
需要增加相关的配置类,Spring Cloud Config 读取配置中心内容的方式和读取本地配置文件中的配置是一模一样的。可以通过 @Value 或 @ConfigurationProperties 来获取。
使用 @Value 的方式:
@Data
@Component
public class GitConfig {

    @Value("${data.env}")
    private String env;

    @Value("${data.user.username}")
    private String username;

    @Value("${data.user.password}")
    private String password;

}
使用 @ConfigurationProperties 的方式:
@Component
@Data
@ConfigurationProperties(prefix = "data")
public class GitAutoRefreshConfig {

    public static class UserInfo {
        private String username;

        private String password;

        public String getUsername() {
            return username;
        }

        public void setUsername(String username) {
            this.username = username;
        }

        public String getPassword() {
            return password;
        }

        public void setPassword(String password) {
            this.password = password;
        }

        @Override
        public String toString() {
            return "UserInfo{" +
                    "username='" + username + '\'' +
                    ", password='" + password + '\'' +
                    '}';
        }
    }

    private String env;

    private UserInfo user;
}
4、增加一个 RESTController 来测试使用配置
@RestController
public class GitController {

    @Autowired
    private GitConfig gitConfig;

    @Autowired
    private GitAutoRefreshConfig gitAutoRefreshConfig;

    @GetMapping(value = "show")
    public Object show(){
        return gitConfig;
    }

    @GetMapping(value = "autoShow")
    public Object autoShow(){
        return gitAutoRefreshConfig;
    }
}
5、添加启动类
@SpringBootApplication
public class Application {
    public static void main(String[] args) {
        SpringApplication.run(Application.class, args);
    }
}
启动项目,访问 RESTful 接口
http://localhost:3302/show,结果如下:
{
  "env": "localhost-dev-edit",
  "username": "fengzheng-dev",
  "password": "password-dev"
}
http://localhost:3302/autoShow,结果如下:
{
  "env": "localhost-dev-edit",
  "user": {
      "username": "fengzheng-dev",
      "password": "password-dev"
  	}
}
实现自动刷新
Spring Cloud Config 在项目启动时加载配置内容这一机制,导致了它存在一个缺陷,修改配置文件内容后,不会自动刷新。例如我们上面的项目,当服务已经启动的时候,去修改 github 上的配置文件内容,这时候,再次刷新页面,对不起,还是旧的配置内容,新内容不会主动刷新过来。 但是,总不能每次修改了配置后重启服务吧。如果是那样的话,还是不要用它了为好,直接用本地配置文件岂不是更快。
它提供了一个刷新机制,但是需要我们主动触发。那就是 @RefreshScope 注解并结合 actuator ,注意要引入 spring-boot-starter-actuator 包。
1、在 config client 端配置中增加 actuator 配置,上面大家可能就注意到了。
management:
  endpoint:
    shutdown:
      enabled: false
  endpoints:
    web:
      exposure:
        include: "*"
这里主要用到的是 refresh 这个接口
2、在需要读取配置的类上增加 @RefreshScope 注解
我们是 controller 中使用配置,所以加在 controller 中。
@RestController
@RefreshScope
public class GitController {

    @Autowired
    private GitConfig gitConfig;

    @Autowired
    private GitAutoRefreshConfig gitAutoRefreshConfig;

    @GetMapping(value = "show")
    public Object show(){
        return gitConfig;
    }

    @GetMapping(value = "autoShow")
    public Object autoShow(){
        return gitAutoRefreshConfig;
    }
}
注意,以上都是在 client 端做的修改。
之后,重启 client 端,重启后,我们修改 github 上的配置文件内容,并提交更改,再次刷新页面,没有反应。没有问题。
接下来,我们发送 POST 请求到 http://localhost:3302/actuator/refresh 这个接口,用 postman 之类的工具即可,此接口就是用来触发加载新配置的,返回内容如下:
[ “config.client.version”, “data.env” ] 之后,再次访问 RESTful 接口,http://localhost:3302/autoShow 这个接口获取的数据已经是最新的了,说明 refresh 机制起作用了。
而 http://localhost:3302/show 获取的还是旧数据,这与 @Value 注解的实现有关,所以,我们在项目中就不要使用这种方式加载配置了。
在 github 中配置 Webhook
这就结束了吗,并没有,总不能每次改了配置后,就用 postman 访问一下 refresh 接口吧,还是不够方便呀。 github 提供了一种 webhook 的方式,当有代码变更的时候,会调用我们设置的地址,来实现我们想达到的目的。
1、添加 webhook
进入 github 仓库配置页面,选择 Webhooks ,并点击 add webhook;
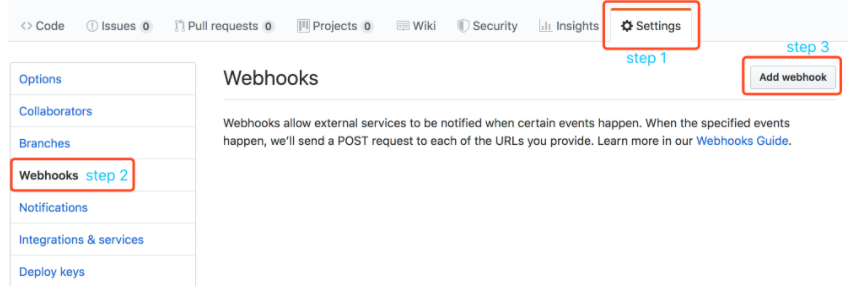
2、填上需要回调的地址
也就是上面提到的 actuator/refresh 这个地址,但是必须保证这个地址是可以被 github 访问到的。如果是内网就没办法了。这也仅仅是个演示,一般公司内的项目都会有自己的代码管理工具,例如自建的 gitlab,gitlab 也有 webhook 的功能,这样就可以调用到内网的地址了。

至此,使用 webhook 实现自动刷新的功能就配置完了。当有配置变更的时候,会调用我们设置的地址,来达到动态更新配置的目的。
使用 Spring Cloud Bus 来自动刷新多个端
Spring Cloud Bus 将分布式系统的节点与轻量级消息代理链接。这可以用于广播状态更改(例如配置更改)或其他管理指令。一个关键的想法是,Bus 就像一个扩展的 Spring Boot 应用程序的分布式执行器,但也可以用作应用程序之间的通信渠道。 —— Spring Cloud Bus 官方解释
如果只有一个 client 端的话,那我们用 webhook ,设置手动刷新都不算太费事,但是如果端比较多的话呢,一个一个去手动刷新未免有点复杂。这样的话,我们可以借助 Spring Cloud Bus 的广播功能,让 client 端都订阅配置更新事件,当配置更新时,触发其中一个端的更新事件,Spring Cloud Bus 就把此事件广播到其他订阅端,以此来达到批量更新。
1、Spring Cloud Bus 核心原理其实就是利用消息队列做广播,所以要先有个消息队列,目前官方支持 RabbitMQ 和 kafka。
这里用的是 RabbitMQ, 所以先要搭一套 RabbitMQ 环境。请自行准备环境,这里不再赘述。然后安装 rabbitmq-management 插件,这样就可以在浏览器访问 15672 查看 UI 管理界面了。
2、在 client 端增加相关的包,注意,只在 client 端引入就可以。
<dependency>
    <groupId>org.springframework.cloud</groupId>
    <artifactId>spring-cloud-starter-bus-amqp</artifactId>
</dependency>
3、在配置文件中增加 RabbitMQ 相关配置,默认的端口应该是 5672。
spring:
  rabbitmq:
    host: localhost
    port: 5672
    username: guest
    password: guest
4、启动两个或多个 client 端,准备来做个测试
在启动的时候分别加上 vm option:-Dserver.port=3302 和 -Dserver.port=3303 ,然后分别启动就可以了。
5、分别打开 http://localhost:3302/autoShow 和 http://localhost:3303/autoShow,查看内容,然后修改 github 上配置文件的内容并提交。再次访问这两个地址,数据没有变化。
6、访问其中一个的 actuator/bus-refresh 地址,注意还是要用 POST 方式访问。之后查看控制台输出,会看到这两个端都有一条这样的日志输出
o.s.cloud.bus.event.RefreshListener: Received remote refresh request. Keys refreshed
7、再次访问第 5 步的两个地址,会看到内容都已经更新为修改后的数据了。
综上所述,当我们修改配置后,使用 webhook ,或者手动触发的方式 POST 请求一个 client 端的 actuator/bus-refresh 接口,就可以更新给所有端了。
结合 Eureka 使用 Spring Cloud Config
以上讲了 Spring Cloud Config 最基础的用法,但是如果我们的系统中使用了 Eureka 作为服务注册发现中心,那么 Spring Cloud Config 也应该注册到 Eureka 之上,方便其他服务消费者使用,并且可以注册多个配置中心服务端,以实现高可用。
好的,接下来就来集成 Spring Cloud Config 到 Eureka 上。
在 github 仓库中增加配置文件

启动 Eureka Server
首先启动一个 Eureka Server,之前的文章有讲过 Eureka ,参考之前的文章
配置 Spring Cloud Config 服务端
服务端和前面的相比也就是多了注册到 Eureka 的配置,其他地方都是一样的。
1、在 pom 中引入相关的包
<dependency>
    <groupId>org.springframework.boot</groupId>
    <artifactId>spring-boot-starter-web</artifactId>
</dependency>

<!-- spring cloud config 服务端包 -->
<dependency>
    <groupId>org.springframework.cloud</groupId>
    <artifactId>spring-cloud-config-server</artifactId>
</dependency>

<!-- eureka client 端包 -->
<dependency>
    <groupId>org.springframework.cloud</groupId>
    <artifactId>spring-cloud-starter-netflix-eureka-client</artifactId>
</dependency>
2、配置文件做配置
application.yml
server:
  port: 3012
eureka:
  client:
    serviceUrl:
      register-with-eureka: true
      fetch-registry: true
      defaultZone: http:localhost:20000/eureka/
  instance:
    preferIpAddress: true
spring:
  application:
    name: config-eureka-server
  cloud:
     config:
        server:
          git:
            uri: ## 你的Github地址
            username: github 用户名
            password: github 密码
            default-label: master
相比于不加 Eureka 的版本,这里仅仅是增加了 Eureka 的配置,将配置中心注册到 Eureka ,作为服务提供者对外提供服务。
3、修改启动类
在 @EnableConfigServer 的基础上增加了 @EnableEurekaClient,另外也可以用 @EnableDiscoveryClient 代替 @EnableEurekaClient
@SpringBootApplication
@EnableConfigServer
@EnableEurekaClient
public class Application {
    public static void main(String[] args) {
        SpringApplication.run(Application.class, args);
    }
}
4、启动服务,之后访问 Eureka ,可以看到服务已注册成功

配置 Spring Cloud Config 客户端
客户端的配置相对来说变动大一点,加入了 Eureka 之后,就不用再直接和配置中心服务端打交道了,要通过 Eureka 来访问。另外,还是要注意客户端的 application 名称要和 github 中配置文件的名称一致。
1、pom 中引入相关的包
<dependency>
    <groupId>org.springframework.boot</groupId>
    <artifactId>spring-boot-starter-web</artifactId>
</dependency>

<dependency>
    <groupId>org.springframework.cloud</groupId>
    <artifactId>spring-cloud-starter-config</artifactId>
</dependency>

<dependency>
    <groupId>org.springframework.boot</groupId>
    <artifactId>spring-boot-starter-actuator</artifactId>
</dependency>

<dependency>
    <groupId>org.springframework.cloud</groupId>
    <artifactId>spring-cloud-starter-netflix-eureka-client</artifactId>
</dependency>
2、配置文件
修改 bootstrap.yml 除了注册到 Eureka 的配置外,就是配置和配置中心服务端建立关系。其中 service-id 也就是服务端的application name。
# eureka 配置新增
eureka:
  client:
    serviceUrl:
      register-with-eureka: true
      fetch-registry: true
      defaultZone: http://localhost:20000/eureka/
  instance:
    preferIpAddress: true


spring:
  profiles:
    active: dev

---
spring:
  profiles: prod
  application:
    name: config-eureka-client
  cloud:
     config:
       label: master
       profile: prod
       # eureka 配置新增
       discovery:
         enabled: true
         service-id: config-eureka-server

---
spring:
  profiles: dev
  application:
    name: config-eureka-client
  cloud:
     config:
       label: master  #指定仓库分支
       profile: dev   #指定版本 本例中建立了dev 和 prod两个版本
       # eureka 配置新增
       discovery:
          enabled: true  # 开启
          service-id: config-eureka-server # 指定配置中心服务端的server-id
application.yml 无变化
server:
  port: 3011
management:
  endpoint:
    shutdown:
      enabled: false
  endpoints:
    web:
      exposure:
        include: "*"

data:
  env: NaN
  user:
    username: NaN
    password: NaN
3、修改启动类
增加了 @EnableEurekaClient 注解,可以用 @EnableDiscoveryClient 代替
@SpringBootApplication
@EnableEurekaClient
public class Application {
    public static void main(String[] args) {
        SpringApplication.run(Application.class, args);
    }
}
4、配置实体类和 RESTController
配置实体类和 RESTController 和上面的一样,没有任何更改,直接参考即可。
5、启动 client 端,联调自测试
访问 http://localhost:3011/autoShow,即可看到配置文件内容。
这个例子只是介绍了和 Eureka 结合的最基础的情况,还可以注册到高可用的 Eureka 注册中心,另外,配置中心服务端还可以注册多个实例,同时保证注册中心的高可用。
注意事项
在 git 上的配置文件的名字要和 config 的 client 端的 application name 对应;
在结合 eureka 的场景中,关于 eureka 和 git config 相关的配置要放在 bootstrap.yml 中,否则会请求默认的 config server 配置,这是因为当你加了配置中心,服务就要先去配置中心获取配置,而这个时候,application.yml 配置文件还没有开始加载,而 bootstrap.yml 是最先加载的。
总结
首先,我们在 Spring Boot 项目中集成 Spring Cloud Config,并以 github 作为配置存储,实现了基础版的配置中心(不集成 Eureka)。并在这个基础上实现配置的自动刷新;
最后,我们结合 Eureka 的配置中心,实现了一个 config 配置中心的高可用方案;
文档信息
- 本文作者:Piter Jia
- 本文链接:https://piterjia.github.io/2020/06/13/spring-cloud-config/
- 版权声明:自由转载-非商用-非衍生-保持署名(创意共享3.0许可证)